김보안의 블로깅
  • 🏠 Home
  • 📚 Project
    • Blockchain
      • 🎦 PickMe
      • 🎦 IoTC
      • 🎦 Blackchain
      • 📃 Gemology
      • 🎦 PickMe
      • 🎦 PickMe
    • AI
      • 👋 A.I. Dream Reader
      • 🎦 A.I. Dream Reader
    • Security
      • 🎦 SNAC
    • Education
      • 🎦 Smart Lecture
  • 🤸‍♂ Hobby
    • Music
      • Violin
      • Guitar
      • Piano
      • Drum
    • Flower
      • Flower Certificate
    • Sport
      • Ski
      • Skateboard
      • Golf
      • Boxing
레이블이 Plasma leap인 게시물을 표시합니다. 모든 게시물 표시

2019년 2월 24일 일요일

Plasma Leap (leap-node, leap-core, leap-contracts 등) 구동 자동화

 SecureKim     오전 3:50     Automation, Blockchain, Plasma, Plasma leap     No comments   


전체를 재구동 하는 일이 잦아 자동화 하였고, Eth 넣어주는 동작까지 잘 되는것을 확인하였습니다.

Base를 위한 자동화는
https://github.com/securekim/auto-leap
에 최신 버전이 있으니 참고하세요

먼저 auto-leap.js 의 METAMASK_ACCOUNT 는 본인의 METAMASK 계정으로 수정해야 합니다.

수정 이후 yarn add web3 한번 하고 auto-leap.sh 을 leap-node, leap-contracts 등이 있는 폴더 위에서 돌리면

truffle 실행, contract compile, contract deploy, node / bridge / remix, auto-leap.js 를 실행 해 줍니다.

이후 auto-leap.js 에서는 METAMASK 계정에 10 이더를 넣어주고

컨트랙트 주소, 계정 주소를 leap-node.log 에 출력해 줍니다.

※ 8545 로 동작하도록 해 두어 remix 에서 포트 수정할 필요가 없습니다.

cat auto-leap.js

const METAMASK_ACCOUNT = "0x9C73363B89C0Eda0dbA1B4a5250E891F60723378"; //바꾸세요

var Web3 = require("web3");
const fs = require('fs');

//const web3 = new Web3(Web3.givenProvider || 'ws://localhost:9545');//, options); //FOR CONSOLE
const web3 = new Web3(Web3.givenProvider || 'http://localhost:8545');//, options); //FOR TEST RPC


web3.eth.getAccounts((error, result) => {
web3.eth.sendTransaction(
{from:result[0],
to:METAMASK_ACCOUNT, //CHANGE IT (METAMASK)
value: "10000000000000000000",
data: "0xdf"
}, (err, transactionHash) => {
if (!err)
console.log(transactionHash + " success");
});

fs.appendFile('auto-leap.log', '\nTruffle Account :\n ' + result[0] + '\n', function (err) {
if (err) throw err;
console.log('Saved!');
});

fs.appendFile('auto-leap.log', '\nMetamask Account :\n ' + METAMASK_ACCOUNT + '\n', function (err) {
if (err) throw err;
console.log('Saved!');
});
});


cat auto-leap.sh

#!/bin/bash
sudo killall -9 node
sudo killall -9 sudo
cd leap-contracts
truffle networks --clean
clear
testrpc&
sleep 3
truffle compile
truffle migrate --reset
truffle networks > ../auto-leap.log
sed -i 's/undefined\:undefined/localhost\:8545/g' build/nodeFiles/generatedConfig.json
cd ../leap-node
node index.js --config=../leap-contracts/build/nodeFiles/generatedConfig.json&
cd ../leap-contracts
sudo remixd -s . --remix-ide "https://remix.ethereum.org"&
python -mwebbrowser https://remix.ethereum.org&
cd ../bridge-ui
yarn start&
sleep 5
python -mwebbrowser http://localhost:1234&
cd ..
node auto-leap.js
실행 위치를 위한 구조는 아래와 같습니다.

├── auto-leap.js     // Metamask 계정에 10 이더 넣어 줌
├── auto-leap.log  // 컨트랙트 주소, 계정 주소 알려줌
├── auto-leap.sh   // truffle 실행, contract compile, contract deploy, node / bridge / remix
├── bridge-ui
├── leap-contracts
├── leap-core
├── leap-node
├── node_modules


testrpc 설치가 필요합니다.

sudo npm install -g –production windows-build-tools 
sudo npm install -g ethereumjs-testrpc 


Read More
  • Share This:  
  •  Facebook
  •  Twitter
  •  Stumble
  •  Digg

2019년 1월 29일 화요일

Plasma Leap 사용하기 (Deposit)

 SecureKim     오전 2:01     플라즈마, Blockchain, deposit, leap, Plasma, Plasma leap     No comments   


이전 편에 이어서 사용하기 편입니다.

우선 각종 주소들을 확보합니다.

1. Truffle 주소


2. Metamask 주소


3. native token 주소 (truffle)


이제 remix 에서 NativeToken 을 컴파일하고 추가합니다.

At Address 는 3번 native token 주소를 적습니다.


아래에서 isMint 를 콜해서 1번 Truffle Account와 2번 Metamask 주소를 넣고
해당 Account 에 토큰을 넣어봅니다.


메타마스크 계정에 돈을 넣고


메타마스크에서 토큰 추가 버튼을 클릭, 3번 네이티브 주소를 추가해 결과를 확인합니다.


월렛에 돈이 쌓입니다~


이제 remix 에서 1번 2번을 approve 합니다.


이제 가스 지불을 위한 ETH 를 확보합니다.

Truffle 에서 아래 명령 입력.


web3.eth.sendTransaction({from:"1번 Truffle 계정", to:"메타마스크주소", value:web3.utils.toWei("10","ether")}).then(function(rec){console.log(rec);});


그러면 메타마스크에 이더가 들어와서 잠시나마 행복을 느낄 수 있습니다.

이후 Deposit 을 해봅니다.

Deposit


1 LEAP 을 걸고 메타마스크에서 승인을 클릭합니다.
->

아직 안나갔고, 테스트만 되었습니다. 이제 다시 승인하면 진짜로 갑니다.


이더에서 가스비가 나갔네요


leap-node 쪽 로그를 보면 Deposit 을 체크했고

텐더민트쪽에서는 block 이 실행되었음이 체크 되었고,
현재 상태가 커밋되었음을 알 수 있습니다.


Read More
  • Share This:  
  •  Facebook
  •  Twitter
  •  Stumble
  •  Digg

2019년 1월 15일 화요일

Plasma Leap 구동하기 (최종편)

 SecureKim     오전 2:35     구동, Blockchain, Plasma, Plasma leap, plasma-dao, truffle     No comments   


저번에 결국 구동도 못해보고 삽질을 너무 많이 했다.

저번에 이어서 다시 한번 정리해 보고, 구동을 해보자.

일단 truffle 을 구동하고 필요한 contract 를 deploy 해본다.

contract deploy : 

git clone https://github.com/leapdao/leap-contracts.git
cd leap-contracts
yarn
truffle develop


이후 tuffle 내부에서
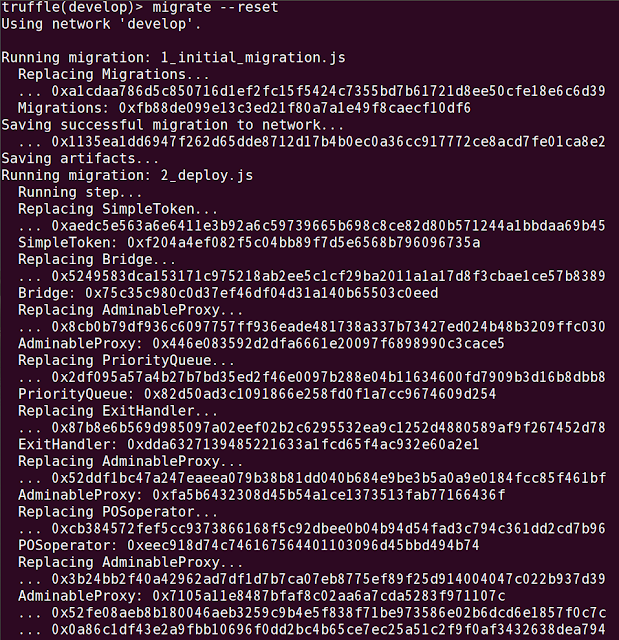
migrate --reset

을 진행하면 contract 가 배포된다.

////// 아래 에러가 나는 경우, truffle 버전을 5.x 대로 올려줘야 합니다. //////

migrate --reset
Error parsing /home/brokim/workspace/leapdao/leap-contracts/contracts/AdminableProxy.sol: ParsedContract.sol:34:41: ParserError: Expected ',' but got identifier
  function applyProposal(bytes calldata data) external ifAdmin returns (bool) {
                                        ^--^
Compilation failed. See above.

///////////////////////////////////////////////////////////////////////////////

그럼 마지막에 어디에 config 가 generated 되었는지 알려준다.


build/nodeFiles 에 가보면 generatedConfig.json 파일이 있다.

버그때문인지, rootNetwork 가 http://undefined:undefined 로 잡혀있다.
이걸 localhost:9545 로 바꿔준다.

sed -i 's/undefined\:undefined/localhost\:9545/g' build/nodeFiles/generatedConfig.json

NODE

이제 leap-node 를 구동할 차례이다.

그러면 아래와 같이 Validator 가 되라는 소리가 나오는데,
git clone https://github.com/leapdao/leap-node.git
cd leap-node
yarn

뜬금없이 crash 가 나면서 core dump 가 떨어지는 경우, 직접 lotion 을 설치해준다.
yarn add lotion

아까 만들었던 generatedConfig.json 을 바탕으로 leap-node 를 구동해 본다.

DEBUG=leap-node,leap-node:period,leap-node:tx,leap-node:error,leap-node:validators,tendermint node index.js --config=../leap-contracts/build/nodeFiles/generatedConfig.json
bridge-dev 는 현재 문제가 많아서 에러가 나고 있고 개발진에서 수정중이다.


좀 더 살펴보자면, 해당 bridge URL로 접속하면 나는 에러의 유형은 다음과 같다.

1. TypeError: Cannot read property 'toLowerCase' of undefined
2. index.330c117862a877cbfb8b.js:1 Uncaught (in promise) Error: Returned values aren't valid, did it run Out of Gas?
3. inpage.js:1 MetaMask - RPC Error: Error: JsonRpcEngine - response has no error or result for request:
{
  "jsonrpc": "2.0",
  "id": 2967365567,
  "method": "net_version",
  "params": [],
  "origin": "bridge-dev.leapdao.org"
}
4. OPTIONS https://testnet-2.leapdao.org/ net::ERR_CONNECTION_TIMED_OUT

자, 느꼈는가? 일단 1번에서 Object.toLowerCase 를 호출하다가 undefined 에러가 났다.
이것은 응당 받아서 존재해야 할 Object 가 비어있다는 뜻이고
에러는 2, 3, 4 번에서 이어진다.
4번을 보면 이유가 확실한데, testnet-2 를 접속하려다가 에러가 나고 있다.
개발자 확인 결과 testnet-1, testnet-2 는 지금 동작하지 않고 있다.

즉, bridge-UI 의 RPC network 주소가 잘못되어 있는 것이다 !
그럼 어떻게 해야할까... 이것은 스스로 bridge 까지 돌려야 한다는 의미다..

일단 leap-node 를 디버깅 하기 위해서 args 설정을 해 주어야 한다.
.vscode/launch.json 파일을 수정해서 args 에 넣어주고, F5 를 눌러 구동한다.
"args": [ "--config=../leap-contracts/build/nodeFiles/generatedConfig.json" ]


remixd
그전에 remix 를 구동해 본다.
이걸 구동하면 remix 가 로컬 파일에 접근 가능 하도록 할 수 있다.
https://github.com/ethereum/remixd 에서 설치한다.

cd leap-contracts
remixd -s . --remix-ide "https://remix.ethereum.org"

그리고 웹 브라우저를 통해 https://remix.ethereum.org/ 로 이동한다.

왼쪽 상단에 링크 표시를 누르게 되면 로컬 호스트에 접근 가능해진다.

(가장 우측 초록색 버튼)


///////////////////// 눌렀을 때 하기 에러 나는 경우 : root 권한으로 실행. //////////////////////

$ remixd -s . --remix-ide "https://remix.ethereum.org"
[WARN] You may now only use IDE at https://remix.ethereum.org to connect to that instance
[WARN] Any application that runs on your computer can potentially read from and write to all files in the directory.
[WARN] Symbolinc links are not forwarded to Remix IDE

[WARN] Symbolic link modification not allowed : . | /home/securekim/workspace/leapdao/leap-contracts
Tue Jan 29 2019 00:31:26 GMT+0900 (KST) Remixd is listening on 127.0.0.1:65520
Tue Jan 29 2019 00:31:37 GMT+0900 (KST) Connection accepted.
[WARN] Symbolic link modification not allowed : ./ | /home/securekim/workspace/leapdao/leap-contracts
setup notifications for /home/securekim/workspace/leapdao/leap-contracts/contracts
events.js:183
      throw er; // Unhandled 'error' event
      ^

Error: watch /home/securekim/workspace/leapdao/leap-contracts/contracts ENOSPC
    at _errnoException (util.js:1022:11)
    at FSWatcher.start (fs.js:1382:19)
    at Object.fs.watch (fs.js:1408:11)
    at createFsWatchInstance (/usr/local/lib/node_modules/remixd/node_modules/chokidar/lib/nodefs-handler.js:37:15)
    at setFsWatchListener (/usr/local/lib/node_modules/remixd/node_modules/chokidar/lib/nodefs-handler.js:80:15)
    at FSWatcher.NodeFsHandler._watchWithNodeFs (/usr/local/lib/node_modules/remixd/node_modules/chokidar/lib/nodefs-handler.js:232:14)
    at FSWatcher.NodeFsHandler._handleDir (/usr/local/lib/node_modules/remixd/node_modules/chokidar/lib/nodefs-handler.js:414:19)
    at FSWatcher. (/usr/local/lib/node_modules/remixd/node_modules/chokidar/lib/nodefs-handler.js:462:19)
    at FSWatcher. (/usr/local/lib/node_modules/remixd/node_modules/chokidar/lib/nodefs-handler.js:467:16)
    at FSReqWrap.oncomplete (fs.js:153:5)

////////////////////////////////////////////////////////////////////////////


여기 contracts 에서 Bridge.sol 을 찾은 다음, 우측 상단에 run 을 클릭하고
Environment 에서 Web3 Provider 를 클릭한 다음, http://localhost:9545 를 입력한다.

Compile 에서 버전도 맞춰줘야 한다.

이제는 트러플 콘솔에서 마이그레이션 실행할 때 해당 주소에 ParsecBridge 를 로딩 할 수 있고, Contract 함수를 호출이 가능해 진다.

metamask 도 사용자 정의에서 9545 로 RPC 연동하자


bridge-ui 

로컬에서 bridge-ui 도 구동해 보자

git clone https://github.com/leapdao/bridge-ui.git

일단 나는 지속적으로 yarn && yarn start 시 다음 에러가 났다.

(개발진은 에러 재현이 안된다고 한다.)


그런데 메시지를 잘 살펴보면 그 전에 메모리 관련 오류가 있었다...

컴퓨터가 안좋으면 가끔 저런 에러가 뜨게 된다.ㅠ

일단 yarn 명령을 살펴보면 다음과 같다.

"postinstall": "rm -f node_modules/web3/index.d.ts && rm -f node_modules/web3/types.d.ts",
    "start": "./node_modules/.bin/webpack-dev-server --config webpack.config.dev.js",
    "build": "rm -rf dist/ && webpack-cli --config webpack.config.prod.js",
    "stats": "rm -rf dist/ && webpack-cli --config webpack.config.prod.js --json > stats.json",
    "precommit": "lint-staged",
    "deploy:dev": "aws s3 sync ./dist s3://bridge-dev.leapdao.org/ --acl public-read && aws cloudfront create-invalidation --distribution-id E3UQO39J2ZIILR --paths '/*'",
    "deploy:testnet": "aws s3 sync ./dist s3://testnet.leapdao.org/ --acl public-read && aws cloudfront create-invalidation --distribution-id ERDV80HEAIPI6 --paths '/*'",
    "deploy:mainnet": "echo \"No bucket for mainnet\" && echo 0"

저건 또 바이너리처럼 보이지만 사실 링크라는 것을 알 수 있고...
cd bridge-ui
node ./node_modules/webpack-dev-server/bin/webpack-dev-server.js --config webpack.config.dev.js

하면 실행 된다는 것을 알 수 있다. 그럼 디버깅을 해보자.
아까 처럼 하면 된다.

디버깅을 하다보니 알게 된 사실인데, web3 를 참조하는 위치는
node_modules/@types/web3/ 인데
어떤애는 Eth 를 참조하고 어떤애는 eth 를 참조해서 생기는 문제로 보인다.

결국 모두 수정해서 patch 파일을 만들었다.

diff --git a/src/stores/governanceContract.ts b/src/stores/governanceContract.ts
index 1ee7f29..3ee5698 100644
--- a/src/stores/governanceContract.ts
+++ b/src/stores/governanceContract.ts
@@ -5,7 +5,7 @@
  * found in the LICENSE file in the root directory of this source tree.
  */
 import Web3Store from './web3';
-import { ABIDefinition } from 'web3/Eth/ABI';
+import { ABIDefinition } from 'web3-eth-abi';
 import { range } from '../utils';
 import {
   governance as governanceAbi,
diff --git a/src/utils/abis/bridge.ts b/src/utils/abis/bridge.ts
index 3c6dba9..b04c785 100644
--- a/src/utils/abis/bridge.ts
+++ b/src/utils/abis/bridge.ts
@@ -1,4 +1,4 @@
-import { ABIDefinition } from 'web3/Eth/ABI';
+import { ABIDefinition } from 'web3-eth-abi';

 export default [
   {
diff --git a/src/utils/abis/exitHandler.ts b/src/utils/abis/exitHandler.ts
index 85181d7..30a25fa 100644
--- a/src/utils/abis/exitHandler.ts
+++ b/src/utils/abis/exitHandler.ts
@@ -1,4 +1,4 @@
-import { ABIDefinition } from 'web3/Eth/ABI';
+import { ABIDefinition } from 'web3-eth-abi';

 export default [
   {
diff --git a/src/utils/abis/poaOperator.ts b/src/utils/abis/poaOperator.ts
index 70aeab8..0bff456 100644
--- a/src/utils/abis/poaOperator.ts
+++ b/src/utils/abis/poaOperator.ts
@@ -1,4 +1,4 @@
-import { ABIDefinition } from 'web3/Eth/ABI';
+import { ABIDefinition } from 'web3-eth-abi';

 export default [
   {
diff --git a/src/utils/abis/posOperator.ts b/src/utils/abis/posOperator.ts
index d428192..3acc1d4 100644
--- a/src/utils/abis/posOperator.ts
+++ b/src/utils/abis/posOperator.ts
@@ -1,4 +1,4 @@
-import { ABIDefinition } from 'web3/Eth/ABI';
+import { ABIDefinition } from 'web3-eth-abi';

 export default [
   {
diff --git a/src/utils/abis/proxy.ts b/src/utils/abis/proxy.ts
index 616e15f..6976a10 100644
--- a/src/utils/abis/proxy.ts
+++ b/src/utils/abis/proxy.ts
@@ -1,4 +1,4 @@
-import { ABIDefinition } from 'web3/Eth/ABI';
+import { ABIDefinition } from 'web3-eth-abi';

 export default [
   {
드디어 에러가 없어졌다.

-> 현재는 개발자 측에서 위 패치를 반영하여 에러가 없어졌다. 참고.


그리고 추가적으로 bridge-ui/src/utils/index.ts 의 수정이 필요한데,
지금 새로 해보니 수정을 안해도 잘 된다.

diff --git a/src/utils/index.ts b/src/utils/index.ts
index 4083aef..82b5cca 100644
--- a/src/utils/index.ts
+++ b/src/utils/index.ts
@@ -15,7 +15,7 @@ export const PLASMA_NODES = {
   4: 'http://node4.testnet.leapdao.org:8645',
 };

-export const DEFAULT_NETWORK = '4';
+export const DEFAULT_NETWORK = '4447'; // Error... Please change the network.

 export const NFT_COLOR_BASE = 32769; // 2^15 + 1

기본적으로 열리는 주소는

http://localhost:1234/

이다. 접속해 보면 블록을 볼 수가 있다.


wallet 에서 아래 에러가 나고 있었는데... 지금은 별도의 수정 없이도 에러가 안나고 있다.


//////////////////////////////////////// 지금은 안남 ////////////////////////////////////
Setting up event listener for contract at 0x06828E256dA65fB03d275Bb698A4f20E537723D3..
-> AdminableProxy 를 접근한 이후에 에러가 나고 있다.

Uncaught (in promise) Error: Returned values aren't valid, did it run Out of Gas?
    at ABICoder.decodeParameters (webpack:///./node_modules/web3-eth-abi/src/index.js?:226)
    at Contract._decodeMethodReturn (webpack:///./node_modules/web3-eth-contract/src/index.js?:465)
    at Method.outputFormatter (webpack:///./node_modules/web3-eth-contract/src/index.js?:818)
    at Method.formatOutput (webpack:///./node_modules/web3-core-method/src/index.js?:163)
    at sendTxCallback (webpack:///./node_modules/web3-core-method/src/index.js?:473)
    at eval (webpack:///./node_modules/web3-core-requestmanager/src/index.js?:147)
    at XMLHttpRequest.request.onreadystatechange (webpack:///./node_modules/web3-providers-http/src/index.js?:96)
    at XMLHttpRequestEventTarget.dispatchEvent (webpack:///./node_modules/xhr2-cookies/dist/xml-http-request-event-target.js?:34)
    at XMLHttpRequest._setReadyState (webpack:///./node_modules/xhr2-cookies/dist/xml-http-request.js?:208)
    at XMLHttpRequest._onHttpResponseEnd (webpack:///./node_modules/xhr2-cookies/dist/xml-http-request.js?:318)


Warning: Can't perform a React state update on an unmounted component. This is a no-op, but it indicates a memory leak in your application. To fix, cancel all subscriptions and asynchronous tasks in the componentWillUnmount method.

decodeParameters 로 변수가 제대로 안가고 있음. (비어있음)

콜스택 :

네트워크 상황 :
wallet call 을 하는데 localhost:8645 랑 rinkeby.infura.io 다.
뭔가가 잘못되었다


src/config/index.ts 부분도 수정

const defaultConfig = {
'name': 'localnet',
'rootNetworkId': '4',
'consensus': 'poa',
'nodes': [
'http://localhost:9545'
]
};

//////////////////////////////////////////////////////////////////////


월렛도 잘 나옵니다 !


Read More
  • Share This:  
  •  Facebook
  •  Twitter
  •  Stumble
  •  Digg

2019년 1월 6일 일요일

Plasma Leap 설치 및 구동하기

 SecureKim     오전 4:39     메타마스크, 블록체인, 플라즈마, Blockchain, metamask, Plasma, Plasma leap     No comments   


Plasma leap Docs:
https://github.com/leapdao/leapdao-docs
https://leapdao.readthedocs.io/en/latest/

텐더민트

텐더민트란
1. 프로토콜이다.
2. BFT(Byzantine Fault Tolerance) 기반 PoS(Proof-of-Stake) 이다.
3. 코스모스(블록체인 대통합...!) 에서도 사용된다.

sudo apt install golang-go
sudo apt install golang-glide
go get github.com/Masterminds/glide

sudo cp go/bin/glide /usr/bin/

mkdir go/tendermint
cd go/tendermint
git clone https://github.com/tendermint/tendermint.git
cd tendermint
sudo cp go/src/github.com/Masterminds/glide/glide.yaml .

glide install
go install ./cmd/tendermint

sudo npm install -g tendermint
sudo npm install leap-node -g

yarn global add leap-node 으로 해야됨 자꾸 에러남.. 아마 이것만 해도 됐을듯.

근데 leap-node --config=https://testnet-1.leapdao.org 를 실행하면
unhandledRejection Error: Invalid JSON RPC response: ""
가 뜬다.

메타마스크 (크롬 확장)
메타마스크는 크롬 확장으로 월렛을 쉽게 연동하고 사용가능하도록 해준다.

https://metamask.io/ 접속해서 설치하면 됨.
그런데 최근에 Passphrase  들이 나오고 순서대로 클릭하도록 업데이트 되었다.

정말 사용자가 문자들을 제대로 적어 두었는지 확인을 위해
순서대로 클릭해 보라는 의미인듯 싶다.
처음 보면 무슨 말인지 모를 수 있음...

설정 후 브라우저 우측 상단 여우를 누른 다음
아래처럼 Rinkeby 테스트넷을 선택한다.


https://bridge-dev.leapdao.org/governance 에서 연동한다.

https://bridge-dev.leapdao.org/faucet 에서 make a tweet 클릭


근데 Request Tokens 를 누르면 콘솔창에
Uncaught TypeError: Cannot set property 'method' of undefined
가 뜬다

PrimeStone (PSC) 를 받아가라는데 어떻게 받는건지...

일단 테스트넷 이더 받는건
https://www.rinkeby.io/#faucet 접속해서
위에서 만든 URL 을 입력하면 된다.
이후 3 Eithers 를 누르면 금방 3 이더가 입금 된다. (metamask 에서 확인)


bridge UI 직접 내 PC 에 설치해보자 -> 렉걸림

git clone https://github.com/leapdao/bridge-ui.git
yarn
yarn start

실행시 아래 에러
Cannot find module 'web3/Eth/ABI'
sudo npm install web3-eth-abi

npm install web3 그래도 에러나서 git에 이슈로 올려놓음


/////////////////////////////////////////////////////////////////////////

leap-contracts

LeapDAO의 plasma leap으로, 다음과 같이 구성되어 있다.

Vault <--- deposithandler="" span=""> ExitHandler ---> Bridge <---> Operator

Vault : 자산 유형 정의 및 등록
DepositHandler : 플라즈마 체인에서 어떻게 Funds 를 획득하는지 Deposit 을 관리. 
ExitHandler : 이 컨트랙트는 사용자 funds 를 담당함.
정확히는 Funds 를 플라즈마 체인에서 exit 하는 부분 담당 
Bridge : period 체인 저장. 플라즈마 체인에서 사실을 비교할 수 있는 원본.
Operator : 이 컨트랙트는 새로운 periods 를 브릿지에 submit 하는 부분을 담당함.

다운받아서 yarn test 를 하게 되면, 순서대로

Bridge -> ExitHandler ->  DepositHandler -> PosOperator 
-> TxLib -> FastExitHandler -> Vault

를 진행한다.

leap-core
다운받아서 테스트하면
npm install
npm test

중복된 트랜잭션 거부, deposit 블록생성, 전송 블록생성, 멀티 트랜잭션 블록 생성 테스트
exit 테스트, Input, Output, Transactions 테스트를 진행한다.

다만 테스트시 버그가 있어 아래와 같이 이슈 등록 을 해두었다.

https://github.com/leapdao/leap-core/issues/36

Read More
  • Share This:  
  •  Facebook
  •  Twitter
  •  Stumble
  •  Digg
이전 게시물 홈

페이지

  • 홈
  • Hobby

Categories

  • AI
  • AWS
  • Blockchain
  • Hardware
  • Javascript
  • Node.js
  • Plasma
  • Security
  • Study
  • Video
  • android
  • mysql
  • review
  • windows

Popular Posts

  • Termux 로 안드로이드에 우분투(GUI)와 VSCode설치하기
      많은 글들이 있지만 뭔가 대부분 잘 안됐다. 이번 기회에 정리한다. 0. 먼저 Termux와 Remote Desktop Manager를 설치한다. Remote Desktop Manager 대신 아래도 나쁘지 않다. 화면이 작지만 마우스 스크롤이나 ...
  • 회사 프록시와 인증서에 고통받는 그대를 위한 글 (Bash, Gradle, Python, wget, nodejs(npm), apt-get, cURL, git, yarn, androidStudio)
    대기업에 입사하면 장단점이 있는데, 단점 중에 하나가 회사에서 프록시를 사용하여 트래픽 감시를 하므로 프록시 설정을 해주어야 한다는 점 입니다. 특히, 회사에서는 https 트래픽도 감시를 하므로 인증서도 설정해 주어야 합니다. 그런데 문...
  • RSA에 대한 설명과 간단한 구현 (C++)
    안녕하세요. SSL에 대해 공부하던중 RSA가 잘 이해가 안되서 직접 간단하게 구현해 보았습니다. 이해를 돕기위해 색상을 넣었는데요. 노란색은 폐기. 초록색은 공개. 붉은색은 비공개 입니다. RSA 준비과정 1. p...

Blog Archive

  • ▼  2025 (2)
    • ▼  8월 (1)
      • 삼성 안드로이드 폰에서 루팅, tcpdump 없이 패킷 덤프하기 (BLE, Wifi 모두 ...
    • ►  7월 (1)
  • ►  2024 (2)
    • ►  11월 (2)
  • ►  2023 (2)
    • ►  10월 (1)
    • ►  1월 (1)
  • ►  2022 (10)
    • ►  12월 (1)
    • ►  11월 (3)
    • ►  9월 (1)
    • ►  8월 (1)
    • ►  6월 (2)
    • ►  3월 (2)
  • ►  2021 (9)
    • ►  12월 (3)
    • ►  11월 (1)
    • ►  6월 (1)
    • ►  5월 (2)
    • ►  4월 (2)
  • ►  2020 (12)
    • ►  10월 (1)
    • ►  9월 (2)
    • ►  7월 (1)
    • ►  6월 (1)
    • ►  5월 (5)
    • ►  4월 (1)
    • ►  2월 (1)
  • ►  2019 (14)
    • ►  10월 (2)
    • ►  7월 (1)
    • ►  3월 (4)
    • ►  2월 (2)
    • ►  1월 (5)
  • ►  2018 (14)
    • ►  12월 (2)
    • ►  11월 (4)
    • ►  10월 (1)
    • ►  8월 (2)
    • ►  5월 (4)
    • ►  1월 (1)
  • ►  2017 (12)
    • ►  10월 (2)
    • ►  9월 (9)
    • ►  5월 (1)
  • ►  2016 (8)
    • ►  10월 (2)
    • ►  8월 (1)
    • ►  6월 (1)
    • ►  1월 (4)
  • ►  2015 (6)
    • ►  12월 (3)
    • ►  10월 (1)
    • ►  6월 (1)
    • ►  5월 (1)
  • ►  2014 (10)
    • ►  11월 (1)
    • ►  9월 (1)
    • ►  7월 (1)
    • ►  6월 (1)
    • ►  5월 (3)
    • ►  4월 (1)
    • ►  3월 (2)
  • ►  2013 (28)
    • ►  12월 (3)
    • ►  11월 (6)
    • ►  10월 (6)
    • ►  9월 (6)
    • ►  8월 (1)
    • ►  7월 (3)
    • ►  6월 (3)

구독

글
Atom
글
전체 댓글
Atom
전체 댓글

로드 중입니다...

각오

직접 해보지 않은 것은 포스팅 하지 않겠습니다.

Copyright © 김보안의 블로깅 | Powered by Blogger
Design by Hardeep Asrani | Blogger Theme by NewBloggerThemes.com | Distributed By Gooyaabi Templates